Tuesday, August 8, 2017

Ransomware

Ransomware.., what is this?

Ransomware is a type of malware that prevents or limits users from accessing their system, either by locking the system's screen or by locking the users' files unless a ransom is paid.

Ransomware malware can be spread through malicious e-mail attachments, infected software apps, infected external storage devices and compromised websites. In a lockscreen attack, the malware may change the victim’s login credentials for a computing device; in a data kidnapping attack, the malware may encrypt files on the infected device as well as other connected network devices.

How does it happen? 


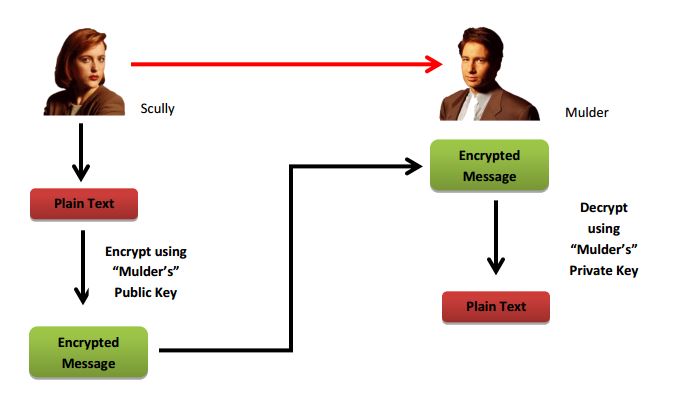
In most cases, clicking on the wrong link or downloading the wrong file or program, this encrypts your files using a private key that only the attacker possesses. It means attackers will hide a malicious code in the file and distribute it. 

After attack happens The victim may receive a pop-up message or email warning that if the ransom is not paid by a certain date, the private key required to unlock the device or decrypt files will be destroyed. 


These days ransomware doesn’t just effect desktop machines or laptops, it also targets mobile phones.


OverTheWire - "Bandit" Solutions :)

Bandit is a one of famous wargames. It is targeted for the beginners. It will teach the basics needed to be able to play other wargames.

And what is a Wargame?
Wargame (hacking) ... In hacking, a wargame (or war game) is a cyber-security challenge and mind sport in which the competitors must exploit or defend a vulnerability in a system or application, or gain or prevent access to a computer system.


Now let's see how to play this game..,

First you have to setup a platform to play this game. You can use Linux/Unix or Windows platforms. 

If you are using Linux/Unix follow these steps first:

  1. Open a Terminal
  2. type ssh <Level Number>@bandit.labs.overthewire.org -p 2220 and then type <the password you have found>                                                       Eg: bandit0@bandit.labs.overthewire.org -p 2220
  3. Once you found the password for the next level, use 'exit' command to disconnect connection to server.
  4. Reconnect to the server to go the next level.
If you are using Windows follow these steps:
  1. Download "Putty" from this link -> https://www.chiark.greenend.org.uk/~sgtatham/putty/latest.html
          Make sure to download "putty.exe (the SSH and Telnet client itself)" file.  


     2. Open Putty and set the Host name and Port


    3. Once terminal is opened provide username and password

    4. After you  found the password for the next level restart the Putty and                 go the next level

Let's begin the War!!! :)

Level 0 

Type Username as 'bandit0' & Password as 'bandit0'
then read the password from the file readme on the home directory. The password in the file is for the bandit1 user which is the user for the next level.

bandit0@melinda:~$ ls -lh
readme
bandit0@melinda:~$ cat readme
boJ9jbbUNNfktd78OOpsqOltutMc3MY1    <-- Password for the next level


Level 0 -> 1

Type Username as 'bandit1' & Password as 'boJ9jbbUNNfktd78OOpsqOltutMc3MY1'

They told that the password is in a file called “-“. We need to delimit the dash to read it.

bandit1@melissa:~$ ls
-
bandit1@melissa:~$ cat ./-
CV1DtqXWVFXTvM2F0k09SHz0YwRINYA9  <-- Password for the next level


Level 1 -> 2

Type Username as 'bandit2' & Password as 'CV1DtqXWVFXTvM2F0k09SHz0YwRINYA9'

This time we simply need to read a file with spaces in it’s name. Let’s surround the file name in quotes.

bandit2@melissa:~$ ls
spaces in this filename
bandit2@melissa:~$ cat "spaces in this filename"
UmHadQclWmgdLOKQ3YNgjWxGoRMb5luK  <-- Password for the next level


Level 2 -> 3

Type Username as 'bandit3' & Password as 'UmHadQclWmgdLOKQ3YNgjWxGoRMb5luK'

They told that the file we need is in a hidden file in the inhere directory.

bandit3@melissa:~$ ls
inhere
bandit3@melissa:~$ cd inhere
bandit3@melissa:~/inhere$ ls -la
total 12
drwxr-xr-x 2 root    root    4096 2012-05-10 23:51 .
drwxr-xr-x 3 root    root    4096 2012-05-10 23:51 ..
-rw-r----- 1 bandit4 bandit3   33 2012-05-10 23:51 .hidden
bandit3@melissa:~/inhere$ cat .hidden
pIwrPrtPN36QITSp3EQaw936yaFoFgAB   <-- Password for the next level


Level 3 -> 4

Type Username as 'bandit4' & Password as 'pIwrPrtPN36QITSp3EQaw936yaFoFgAB'

We are told the password is somewhere in the inhere directory and is the only human readable file in the directory. Let’s see what file types we have.

bandit4@melissa:~$ ls
inhere
bandit4@melissa:~$ cd inhere
bandit4@melissa:~/inhere$ ls -la
total 48
drwxr-xr-x 2 root    root    4096 2012-05-10 23:51 .
drwxr-xr-x 3 root    root    4096 2012-05-10 23:51 ..
-rw-r----- 1 bandit5 bandit4   33 2012-05-10 23:51 -file00
-rw-r----- 1 bandit5 bandit4   33 2012-05-10 23:51 -file01
-rw-r----- 1 bandit5 bandit4   33 2012-05-10 23:51 -file02
-rw-r----- 1 bandit5 bandit4   33 2012-05-10 23:51 -file03
-rw-r----- 1 bandit5 bandit4   33 2012-05-10 23:51 -file04
-rw-r----- 1 bandit5 bandit4   33 2012-05-10 23:51 -file05
-rw-r----- 1 bandit5 bandit4   33 2012-05-10 23:51 -file06
-rw-r----- 1 bandit5 bandit4   33 2012-05-10 23:51 -file07
-rw-r----- 1 bandit5 bandit4   33 2012-05-10 23:51 -file08
-rw-r----- 1 bandit5 bandit4   33 2012-05-10 23:51 -file09
bandit4@melissa:~/inhere$ file ./-*
./-file00: data
./-file01: data
./-file02: data
./-file03: data
./-file04: data
./-file05: data
./-file06: data
./-file07: ASCII text
./-file08: data
./-file09: data
bandit4@melissa:~/inhere$ cat ./-file07
koReBOKuIDDepwhWk7jZC0RTdopnAYKh  <-- Password for the next level


Level 4 -> 5

Type Username as 'bandit5' & Password as 'koReBOKuIDDepwhWk7jZC0RTdopnAYKh'

This is similar to the previous, except we have some more file attributes to look for. As well as more files to look through.

bandit5@melissa:~$ ls
inhere
bandit5@melissa:~$ cd inhere
bandit5@melissa:~/inhere$ ls -la
total 88
drwxr-x--- 22 root bandit5 4096 2012-05-10 23:51 .
drwxr-xr-x  3 root root    4096 2012-05-10 23:51 ..
drwxr-x---  2 root bandit5 4096 2012-05-10 23:51 maybehere00
drwxr-x---  2 root bandit5 4096 2012-05-10 23:51 maybehere01
drwxr-x---  2 root bandit5 4096 2012-05-10 23:51 maybehere02
drwxr-x---  2 root bandit5 4096 2012-05-10 23:51 maybehere03
drwxr-x---  2 root bandit5 4096 2012-05-10 23:51 maybehere04
drwxr-x---  2 root bandit5 4096 2012-05-10 23:51 maybehere05
drwxr-x---  2 root bandit5 4096 2012-05-10 23:51 maybehere06
drwxr-x---  2 root bandit5 4096 2012-05-10 23:51 maybehere07
drwxr-x---  2 root bandit5 4096 2012-05-10 23:51 maybehere08
drwxr-x---  2 root bandit5 4096 2012-05-10 23:51 maybehere09
drwxr-x---  2 root bandit5 4096 2012-05-10 23:51 maybehere10
drwxr-x---  2 root bandit5 4096 2012-05-10 23:51 maybehere11
drwxr-x---  2 root bandit5 4096 2012-05-10 23:51 maybehere12
drwxr-x---  2 root bandit5 4096 2012-05-10 23:51 maybehere13
drwxr-x---  2 root bandit5 4096 2012-05-10 23:51 maybehere14
drwxr-x---  2 root bandit5 4096 2012-05-10 23:51 maybehere15
drwxr-x---  2 root bandit5 4096 2012-05-10 23:51 maybehere16
drwxr-x---  2 root bandit5 4096 2012-05-10 23:51 maybehere17
drwxr-x---  2 root bandit5 4096 2012-05-10 23:51 maybehere18
drwxr-x---  2 root bandit5 4096 2012-05-10 23:51 maybehere19
bandit5@melissa:~/inhere$ find ./ -size 1033c
./maybehere07/.file2
bandit5@melissa:~/inhere$ cat ./maybehere07/.file2
DXjZPULLxYr17uwoI01bNLQbtFemEgo7  <-- Password for the next level


Level 5 -> 6

Type Username as 'bandit6' & Password as 'DXjZPULLxYr17uwoI01bNLQbtFemEgo7'

The file can be anywhere on the server, but we are given it’s attributes. This is a job for find. The command attached to the end gets rid of garbage returns and allows viewing of our password file among several others with the same attributes.

bandit6@melissa:~$ find / -user bandit7 -group bandit6 -size 33c 2>/dev/null
/var/lib/dpkg/info/bandit7.password
bandit6@melissa:~$ cat /var/lib/dpkg/info/bandit7.password
HKBPTKQnIay4Fw76bEy8PVxKEDQRKTzs  <-- Password for the next level


Tuesday, July 25, 2017

Way to HACK an Operating System using Metasploit

We can gain access to an Operating System, though another operating system. So we can do anything in that machine which we hacked. But there are few conditions which should satisfied. 

  • Make sure both the Operating Systems are in same IP range.
  • There should be a vulnerability in the OS which we are going to exploit. 

Now let's see it with a simple example

Here my Vulnerable OS is Windows 2000 (you can try this in all the operating systems). 
and I'm going to exploit it with Kali Linux.

To do the process there are some key tools needed. Those are,
  • Nmap
  • Nessus tool
  • Exploit-DB
  • Metasploit
Now look in to the process.., 

First set up both the Kali and Windows 2000 to same ip ranges. Because we can't ping each other with different ip ranges.

Here is the Kali's IP


and Windows 2000 IP is this.., 


then ping each other
use ping <other machine's IP address> command to do that

If it happened successfully you'll display it like this..,


Next, using nmap tool, find open ports in of Windows 2000
use nmap <Windows 2000's IP address> command


Then identify vulnerabilities using Nessus tool. It will display vulnerabilities separately group by the criticality.


those are the vulnerabilities found in Windows 2000.We can't exploit all the vulnerabilities. We should find a exploitable vulnerability next.

then, use the command msfconsole 

Next, try to find exploitable vulnerability. to do that first use the command

search  <the code of the vulnerability which was found from Nessus>


here i'm trying with MS03-026: Microsoft RPC Interface Buffer Overrun (823980) vulnerability.


then do as following pictures.., 


This vulnerability allows us to create a meterpreter session with the server by metasploit. And we can access the windows 2000 shell with root privileges.


Now we are in windows 2000’s root.
Now we can access the windows 2000 from Kali. 
As an example we can get System information and Network configurations in Windows, from Kali.


And we can also access the UI of Windows 2000 from kali using a exploitable vulnerability.


Hope you guys understand this post. If it is a doubt feel free to send me a mail.. :)


Monday, July 24, 2017

Let's login to a site using SQL INJECTION

What is SQL Injection?

Simply, SQL injection is a code injection technique that might destroy your database. and it is one of the most common web hacking techniques.

In other terms, SQL injection is a code injection technique, used to attack data-driven applications, in which nefarious SQL statements are inserted into an entry field for execution (e.g. to dump the database contents to the attacker).

Now we'll see what should we do to login to a Web Site which we didn't signup before..,

A person who is trying to login to a certain site without signing up, he/she can use following command to username and password text boxes. SQL Injection can be performed with following values to bypass authentication


         " or ""="

It's just like this..,


The code at the server will create a valid SQL statement as follows,
  
  SELECT * FROM Users WHERE Name ="" or ""="" AND Pass ="" or ""=""


What should we do to prevent SQL Injection?

To prevent SQL Injection, we need to avoid running dynamic queries and use prepared statements in the code.


Friday, May 19, 2017

Facebook App - OAuth

Nowadays Facebook apps are very popular among the people. There are various types of apps developed by many people. These apps are built most of the time for entertaining purposes.
Today everyone who is using Facebook, they use at least one app. Most of the time when someone sees an app interesting they click on that app. As an example if you click on an app they ask you to login as Facebook. So if you have a Facebook account you can access that app without any issue. But do you know how we able to access an app which developed by unknown person? That’s the point the OAuth word comes to our topic.
Actually what is this OAuth or Open Authorization mean? OAuth is a framework for delegated authorization. It’s a protocol to access an external party. It allows an end user’s account information to be used by third-party services, such as Facebook / Twitter, without exposing the user’s password.
Let’s see what the procedure of this OAuth framework is.


In this blog post I’m going to show you how to create a simple Facebook account using OAuth.


You can visit this URL to download a sample application from my github account.


Now we move to the creating steps..

First go to the https://developers.facebook.com/ page and create an app.


After that if you’re not logged in to our Facebook account, login to it. If you already logged in just go to “My Apps” which is on the top right corner of the page and simply click “New App”. Then give the required details. 


Then you will display a interface like this… Click the "get started" button in "Audience network"


Then choose a platform


After that you will see a page like this. There you should provide valid redirect URL in valid OAuth direct URLs. In my scenario my Facebook app is hosted in localhost/fb/ folder.


In “Settings” tab give the app domain and the Website URL… You can see the App ID and the App Secret here.


Now we will see how to use this Redirection point URL, App ID and the App Secret to get information from the Facebook.,


We have to prepare the URL for this app. To that first of all we should encode response type, client ID , Redirect uri and scope. You can use online encoding tool for do it. Here is a sample online encoding tool (https://meyerweb.com/eric/tools/dencoder/). Here is my one..,

·         response_type
Before encoding – Code                      
After encoding – Code

·         client_id
Before encoding – 1326621240784654   
After encoding – 1326621240784654

·         redirect_uri
Before encoding – http://localhost/faceb/       
After encoding –  http%3A%2F%2Flocalhost%2Ffaceb%2F

·         scope
Before encoding – public_profile user_friends user_photos user_posts
After encoding – public_profile%20user_friends%20user_photos%20user_posts


Now type https://www.facebook.com/dialog/oauthand combine all these encoded values and paste it on URL bar. Then, you will redirect to a page like this.
Example - https://www.facebook.com/dialog/oauth?response_type=code&cclient_id=1326621240784654&redirect_uri=http%3A%2F%2Flocalhost%2Ffaceb%2F&scopepublic_profile%20user_friends%20user_photos%20user_posts


After that you will display another page simply click on "Continue as <your name>" or you can edit privacy and then click on it.
Then this page will display..,


Why are we getting this type of message? Because we don’t have a project to support http://localhost/faceb

But in URL box we can get the authorization code which sent from the Facebook

http://localhost/faceb/?code=JSCRsjK348Gmy1upjm7vXVWPA5_n3A64gRs43npMFInR7b3H2-ibuf7s9vMaPnx3uqQt_oT2wx7XeICuIUlR2J-xICsHREiV5RmZ_-tqEPxKZYWfbI9qCtUopJBtLPkvC7KkPlWsshukf2siNYG1oAJTI87cYmNPC5_vhFdJeVAG7jqPu-Wbc1ACrLHMkCvMXXiWryWz0hMOGWMiZfgA8kteKuj0Y18fzL8vI156P1UiOiOr9pAz11OXrEPtga
7bZt4UJzzFJ0V8QJ0rof8Kc2HmKvGoaKpOC6oJBpR09fPo2fRs8umhQ5JMa4pHZwpm7j4nI-t4goKumDxpMMnlHG7R#_=_  

In the HTTP Headers, we need to add the Authorization header with the App credentials. 
App_ID                1326621240784654
App_Secret        a1adb0a3904efe17c94fb48474a941c9
APP_ID:APP_Secret 1326621240784654:a1adb0a3904efe17c94fb48474a941c9

Now encode this whole value by using a 64 bit encoder..

MTMyNjYyMTI0MDc4NDY1NDphMWFkYjBhMzkwNGVmZTE3Yzk0ZmI0ODQ3NGE5NDFjOQ
To receive the Access Token we should clearly mention the token endpoint.
Before type this values in URL bar you should install the “RESTClient” plugin to your browser.
Then type https://graph.facebook.com/oauth/access_token and give those values as before to obtain access token.


How to retrieve properties using Access Token?
Method – GET
Authorization: Bearer <access token value>
This will give user’s ID in JSON object format. Using this ID you can get any information you want.


Now it’s time to look at the implementation of this app. I implemented this using PHP. To do the implementation you have to get the Facebook SDK v5 for PHP. It’s also available in my github repository.

These are the files which contains in that folder.,


If you are not already logged in to your Facebook account, when you run the app you will display this page. This is the index.php page.


Then you will display the login page of Facebook. After login to your account you will redirect to 1.php (in my app) page. It’s like this..,


You can download source code and Facebook SDK v5 for PHP folder from my github account by clicking above URL..

Try to create your own Facebook App using OAuth.. :)


Thank You! :) :)

Friday, April 7, 2017

Encryption & Decryption

What is Encryption? 

Basically, Encryption is the process transforming data or information into a code, especially to prevent unauthorized access. 
It is generally used to protect sensitive information so that only authorized parties can view it.

Simply,when sending a message without encrypting anyone can read the stuffs which includes that message. 


In this scenario, Scully is the sender and Mulder is the receiver and the Alien is the is the 3rd party who does not have a authorized to read this message. Scully didn't encrypt the message before sending it to the Mulder. So Alien can read the message.


In about scenario Scully encrypted the message before she sends it to Mulder. So Alien can't read the message.   

We can divide Encryption into two main parts.,

  1. Symmetric Encryption
  2. Asymmetric Encryption

Symmetric Encryption
Symmetric encryption algorithms are best known as shared-secret key algorithms. The cryptography key is using for both encryption of Plain Text and decryption of Ciphertext.

  • The usual key length is 80 to 256 bits.
  • A sender and receiver must share a secret key.
  • They are usually quite fast (wire speed), because these algorithms are based on simple mathematical operations.
  • Examples of symmetric encryption algorithms are DES, 3DES, AES, IDEA, RC2/4/5/6, and Blowfish.
Simply we can describe symmetric encryption in this way...


Asymmetric Encryption
Asymmetric encryption algorithms characteristics include:

  • Asymmetric encryption algorithms are best known as public key algorithms.
  • The usual key length is 512 to 4,096 bits.
  • A sender and receiver do not share a secret key.
  • These algorithms are relatively slow, because they are based on difficult computational algorithms.
  • Examples: RSA, ElGamal, elliptic curves, and DH.

In Asymmetric Encryption both the sender and the receiver has pair of keys call Public Key and the Private Key. Public Key is a key that anyone can get. But the Private Key is a unique key which only known by the owner (Sender or the Receiver). When encrypting a plain text via Sender's Public Key, the receiver can decrypt that message only through by Sender's Private Key. If some message encrypted from Receiver's Public Key, that message can only decrypt by Receiver's Private Key. Likewise when some message encrypted in Sender's or Receiver's Private Key, it can decrypt only by Sender's or Receiver's Public Key. Here is a simple example for Asymmetric Encryption...


I have implemented simple Encryption / Decryption software to hide the content of your "Text (.txt)" files. I used AES 128 bit Algorithm to encrypt data in your text files. And here is the link to download that software..

https://github.com/janitha1st/Encryption-Decryption-Software-Application 

This software is implemented using NetBeans IDE 8.1 and the Language is Java.


  • This is the main interface of my Software.


  • First you have to give the path to the text file that you need to encrypt. Here "Hello_Cyber" is my text file and it placed in Desktop. 


  • This is the content which included in my text file before encrypting.


  • After you select the path then click the "Encrypt" button and it'll display a message if it was successful. 
  • After encrypting if you go to the same text file you can see the content like above. It means it was successfully encrypted.
  • After encrypted select the path as done before and click the "Decrypt" button. Then it'll display a message if it is success. 

  • Then you can get the same content which was there before you encrypt the file. 

  • Specially you should add org.apache.commons.io.jar JAR file to your project. It is also include in my github repository. 
Visit my GitHub by clicking : https://github.com/janitha1st/Encryption-Decryption-Software-Application

Hope you guys understand my blog blog. If you have any doubt please send me a mail to janitha.bhakthi93@gmail.com.
Thank You! ;)